
 Maya Chen
Full Player Report
TennisLogic · 2026
TennisLogic · 2026
Maya Chen
Comparison of Forehand · Backhand · Serve across all phases


Every finding from the FH, BH and Serve technique reports mapped directly against what the TennisLogic data actually showed on match day — where they align, where they conflict, and what it means.
The three technique reports used video visual estimates. The match report uses hard TennisLogic data from a real competitive match. They measure different things — mechanics quality vs match-day execution under pressure — but together they form a complete and remarkably coherent picture.
All three technique reports classify Maya Chen as Advanced targeting Elite. Match data backs this: winning 54.5% of points against a competitive opponent with weapons that genuinely hurt (124.4 km/h serve, 86.6 km/h FH, tiebreak domination).
All three reports flag the same pattern: significant pace but incomplete precision. Match confirms exactly this — a serve that DFs 6 times, a FH that wins 6 points but drops 17. The weapons are real; the leaks are real.
FH, BH and Serve reports all identify the same root problem: incomplete sequential loading — shoulders before hips, abbreviated follow-through, moderate lag. Match data shows the consequence: pace without weight, points won from position but not from pressure.
All three reports note the same bookend problems: slightly late preparation trigger and truncated follow-through (~140° vs 180° target). In match data this appears as a 52% win rate in the 0–4 shot rallies — the first exchange is rushed and often defensive.
Technique report's "7/10 serve" feels generous against 6 double faults (opponent: 0) and 40.8% first serve miss rate. 7/10 reflects mechanics quality on video; it doesn't reflect what happens when the score is 30–40 and the serve is 124 km/h. The gap between video-serve and match-serve is the most important insight across all four reports.
The FH tech report is accurate that the forehand is a weapon — 6 winners at 86.6 km/h confirms it. But 17 UFEs in one match means the weapon misfires more than it fires. The technique report identifies the mechanical causes; it doesn't quantify how much they cost in real matches. Now we know: they cost more points than any other single factor.
BH tech report frames the backhand as needing significant work across 5 areas. Match data reveals a different story: only 7 BH UFEs vs the opponent's 12, with solid 74% return rate. The BH is already Maya Chen's more disciplined stroke in competitive play. The technical work adds weapons to an already reliable wing.
124.4 km/h average, 144.9 km/h max, significantly above the opponent's 98.6 km/h. The serve report correctly avoids quoting speeds (visual estimates only). Now that we have the data: the pace is not the problem. Every technical refinement in the serve report will improve consistency while keeping this speed — that's the goal.
The FH over-hits under pressure (17 UFEs). The serve over-hits under pressure (6 DFs). The BH is the most disciplined stroke precisely because it's used more cautiously (54 shots vs 111 FH). The unifying challenge is not mechanical — it's managing aggression under pressure. The technical work in all three reports directly builds the body-driven, chain-loaded mechanics that hold shape when the score is tight. Fix the mechanics; the pressure discipline follows.
| Element | Technique Report Says | Match Data Shows | Verdict |
|---|---|---|---|
| Unit Turn Timing | ~67° · starts slightly late · 18° more available · non-hitting hand releases early | Late prep → 48% of pts end 0–4 shots, only 52% won. First exchange is rushed; first FH is defensive not offensive. | Confirmed |
| Hip–Shoulder Sep. | ~35° current → ~55° target · arm-dominant swing · partial core engagement | 17 UFEs. Arm-dominant swings hold shape on video; they break down under match pressure. Body-driven ~55° separation is the direct fix. | Root cause of 17 UFEs |
| Contact Point | ~13" from body · slightly bent arm · target 16–18" | Only 6 winners from 111 FHs. Short contact = ball lacks depth, opponents absorb comfortably. Extending 3–5" creates the heavier ball that actually pushes opponents back. | Confirmed |
| Racket Lag | Moderate lag · early wrist release · 15–20% speed difference potential | Speed paradox proves it: 84.5 km/h in winning points vs 75.5 in losing points. When lag is right and position is good, the ball is harder. When pushed back, mechanics collapse and pace drops. | Perfectly confirmed |
| Follow-Through | 130–140° rotation · partial chest-to-net · ~45–60° vs 90° elite | Slower recovery to ready position. Many of the 17 UFEs come from a rushed next-ball setup — the truncated finish puts the body out of position for what follows. | Confirmed |
| Weight Transfer | ~60% forward · target 75–80% | Speed paradox directly reflects this: 84.5 km/h (good weight forward, good position) vs 75.5 km/h (weight back, defending). The match data is a real-time readout of weight transfer quality. | Perfectly maps |
| Shot Direction | Not addressed in FH technique report | 40% DTL vs only 26% CC. DTL is the highest-risk direction. Going DTL from a compromised position is the primary error generator. This is the biggest gap in the FH report. | Missing from report |
| Error Rate | Acknowledges over-hitting risk under pressure | 17 UFEs confirmed. FH:BH error ratio 2.4:1. Every third FH in the match was unforced. This is the starkest number in the entire match dataset. | Worse than implied |
The FH report covers mechanics in depth but never addresses shot direction selection. Match data shows 40% DTL — the riskiest direction — as the default choice. The fastest win available may require zero mechanics change: simply defaulting to cross-court under pressure. This belongs in the FH report.
Technique looks solid on video. But 17 UFEs in one match means mechanics collapse specifically under match pressure. The tech report drills mechanics without a section on the decision-making trigger that causes over-hitting when the score matters. The 80% power rule from the match report fills this gap.
Tech report: deeper lag = 15–20% more racket speed. Match data: 84.5 km/h winning vs 75.5 km/h losing. When Maya Chen is in position and her mechanics are working, she hits harder. The lag and separation drills in the FH report directly produce the better match-day numbers.
Arm-dominant swings look fine on video but collapse under pressure. Body-driven swings at ~55° separation hold shape when the score is tight. This is the single most impactful technical change because it addresses the root cause of the biggest error source in the match.
6 winners from 111 forehands (5.4%) means most FHs are comfortably absorbed. Extending to 16–18" adds lever arm that makes the same swing effort produce a deeper, heavier ball — opponents get pushed back and the rally dynamic shifts in Maya Chen's favour.
48% of points end 0–4 shots with only 52% won. Late preparation means the first FH is a reactive arm-swing, not a loaded coil. Turn starting at opponent contact gives full loading time — the first FH becomes an offensive shot instead of a survival shot.
40% DTL vs 26% CC. DTL from a compromised position is where the errors cluster. The fastest win available: go CC automatically under pressure, change direction only from balance inside the baseline. No mechanics change required — just a decision-making rule added to the existing FH work.
| Element | Technique Report Says | Match Data Shows | Verdict |
|---|---|---|---|
| Preparation Timing | Slightly late — reactive not proactive. Turn starts as ball crosses net. Split-step and unit turn are two separate actions. | Despite late prep, only 7 UFEs — BH is more disciplined than FH under the same timing pressure. Proactive prep will make this wing dangerous, not just reliable. | Better in match than implied |
| Hip–Shoulder Sep. | ~35° current → ~55° target. "The single most critical refinement." Partial chain ~60% efficient. | BH 78.8 km/h vs FH 86.6 km/h — that entire 10% pace gap is explained by insufficient separation. Fix this and the BH pace becomes equal to the FH. | Confirmed — pace gap is real |
| Racket Lag Depth | ~hip level · slightly guided · target below hip, gravity-dropped | BH max only 105.4 km/h. Ceiling is being left on the table. The occasional "pushed" rather than "popped" shot the report identifies shows up as low winner count and moderate depth. | Confirmed |
| Contact Extension | ~13" current → ~18" target. Shorter contact = defensive ball, more upward brush, less depth. | Only 1 BH winner from 54 shots. Opponents step in and dictate off the BH. Contact extension is the most direct route to turning the BH into a point-ending shot. | Most urgent BH fix |
| Follow-Through | ~140° rotation → 180° target. Chest not finishing to net. ~60% kinetic chain efficiency. | Only 54 BH shots in the match. Low volume signals BH avoidance — Maya Chen runs around it to use the FH. Incomplete follow-through contributes to low confidence in attacking with the BH. | Confirmed |
| Kinetic Chain | ~60% efficient. Shoulders initiating before hips clear. Arms compensating. "Push not pop." | BH 16% slower than FH. Return points won only 57% on 2nd serve — the BH return is in-play but not converting pressure into points. | Confirmed — pace gap tracks exactly |
| Error Discipline | Report focuses on offensive upgrades, not discipline. Frames BH as needing significant work. | 7 UFEs vs opponent's 12. BH is already the more disciplined wing in match. Tech upgrades add weapons — the discipline foundation is already there. | Stronger than report implies |
The BH report frames this wing as needing the most work across 5 areas. Match data shows the opposite: 7 BH UFEs vs the opponent's 12. In competitive play, Maya Chen's backhand is already the more reliable stroke. The technical work adds firepower — the discipline is already there.
Maya Chen 7 BH errors vs opponent 12 BH errors. This is a tactical edge that isn't mentioned in the BH report at all. Targeting the opponent's backhand with consistent depth is already a winning pattern — as the technical upgrades bed in, this advantage will grow further.
The 2:1 ratio reveals that Maya Chen runs around her BH to use her FH — the classic advanced player pattern. As BH power grows through the contact extension and separation work, deliberately using the BH in neutral situations reduces FH volume and therefore FH errors. The two wings improve each other.
1 winner from 54 shots. Opponents step in and dictate off every BH. Extending to 18" produces the "heavy ball" the report describes — opponents get pushed back, the BH becomes a threat not a reset, and break-point opportunities multiply. Address this before separation work.
BH at 78.8 km/h vs FH at 86.6 km/h. The entire gap is explained by ~35° vs ~55° separation. Once this is achieved, the BH becomes a pace-equal weapon and Maya Chen stops needing to run around it — reducing FH volume and therefore FH errors simultaneously.
Return stats are solid (70%/74% in) but only 57% of 2nd return points won. Earlier prep on the return turns a ball-in-play BH into an attacking return that starts building the point immediately. The BH return can become a genuine break-point creator.
54 BH vs 111 FH = BH avoidance pattern. As the technical refinements bed in, deliberately using the BH in neutral rallies will make Maya Chen less readable. The opponent currently knows 2-in-3 shots will be a FH — removing that predictability changes the tactical dynamic of every rally.
| Element | Technique Report Says | Match Data Shows | Verdict |
|---|---|---|---|
| Trophy Position | Functional but shallow coil. Elbow too high, shoulder not fully externally rotated. Under-loaded before swing starts. | Shallow trophy = inconsistent swing path = 40.8% miss rate on first serves. The inconsistency is upstream of the drop — every miss traces back here first. | Confirmed |
| Leg Drive | ~110° knee bend · moderate · legs assist but don't drive · landing near baseline | With moderate legs: 124.4 km/h avg. With elite leg drive (~150°): 135–140 km/h realistic while accuracy improves. Legs are the only change that simultaneously adds pace AND percentage. | Massive untapped upside |
| Racket Drop | Abbreviated loop. Early pronation. Shorter acceleration path. Not reaching "scratch your back" depth. | 6 double faults from 20 second serves. The abbreviated drop creates an inconsistent swing path under pressure — the most direct mechanical cause of DFs. This is the #1 fix. | Direct cause of 6 DFs |
| Contact Point Height | ~78% arm extension. Shoulder not fully shrugged to ear. A few cm below maximum reach. | Lower contact = smaller net clearance margin = more serves clipping the net. Higher contact simultaneously adds depth and percentage — the rare double benefit in tennis mechanics. | Confirmed |
| Follow-Through | ~140° rotation. Racket not fully wrapping past opposite hip. Landing near baseline. | Landing near baseline = less time to set up for the +1 shot. 1st serve points won are 69% — with faster +1 positioning from committed follow-through, that number could reach 75%+. | Confirmed |
| Overall Power | Report avoids quoting speeds — correctly uses visual estimate framing only | 124.4 km/h average, 144.9 km/h max, vs opponent's 98.6 km/h. Pace is genuinely strong. Power is not the problem. Every refinement in the report improves precision while maintaining this speed. | Stronger than report implies |
| Overall Rating | "7 out of 10 current estimate" · "functional and reliable" | 6 DFs vs opponent's 0. 40.8% first serve miss rate. "7/10" reflects mechanics on video without pressure. In match conditions this serve gifts significant free points — the rating is too generous. | Rating overstates match reliability |
| Direction Variety | Not addressed in serve technique report | 71% Down T · 29% Wide · 0% body serves. Fully predictable. Any opponent reads the T-tendency within 2 service games. Direction variety would make the existing 10 service winners even harder to handle. | Critical gap in report |
This is the largest single gap between any technique report rating and the match data. A 7/10 serve doesn't gift 6 free points. The difference: the serve report assessed mechanics on video without score pressure; 6 DFs happened at 30-40 and deuce when the arm tightened and the abbreviated drop became an inconsistent swing path.
Serve report correctly avoids speeds. Now we have them: 124.4 km/h average, 144.9 km/h max, 25.8 km/h above the opponent. The pace is not a problem to solve — it's an asset to protect while fixing precision. The 4 technical refinements improve both consistency and pace simultaneously.
71% Down T, 29% Wide, 0% body serves. A serve improved by the 4 technical fixes that still goes to the same 2 locations is easier to read. Adding a credible body serve and varying the wide placement would multiply the impact of every improvement the report identifies.
Abbreviated drop creates an inconsistent swing path. Under no pressure it works; under match pressure the path shortens further and the serve misses. "Scratch your back" depth creates a longer, more repeatable arc — the same intention produces the same result under any scoreline. DFs drop to near zero.
Currently ~110° knee bend. Deeper bend + explosion raises contact height → steeper angle → more margin over the net. Most mechanical changes trade pace for accuracy or vice versa. Leg drive is the rare exception that improves both. The serve report identifies this as the biggest untapped power source — match data confirms the upside.
69% win rate when 1st serve lands. Every fix that puts more serves in play is worth 5–7 extra points per match. Trophy depth + full arm extension at contact gains 3–5cm of contact height, which translates directly into higher first serve percentage with the same swing speed.
71% Down T is readable within one service game. Adding a body serve and varying the wide placement forces opponents to cover more court, creating the open spaces that make the T-serve even more effective. Direction variety multiplies the value of every other improvement.
Ranked by match-day impact — the combined weight of what the technique reports identify as most trainable and what the match data shows is costing the most points. These supersede the individual report priority lists.
Match cost: 6 free points gifted to opponent who gave zero back. Abbreviated drop = inconsistent swing path = DFs under pressure. "Scratch your back" depth creates a repeatable arc that holds under any scoreline. This is the highest-leverage fix across all three reports because it gifts free points with zero tactical upside.
Match cost: 17 unforced errors — the biggest single point-loss source of the match. Arm-dominant swings collapse under pressure; body-driven swings at 55° separation hold shape. Combine with the tactical 80% power rule from the match report. Mechanics alone won't fix it — the decision to swing at 80% must become automatic.
Match data: 40% DTL vs 26% CC — the wrong ratio. This is potentially the fastest point-saving change in all four reports because it requires zero technique change. Under pressure, go cross-court automatically. Change direction only from balance inside the baseline. This habit alone could cut FH errors by 30%.
The only mechanical change that simultaneously improves both pace and accuracy. Deeper bend raises contact height, creating steeper angle and more net clearance. The serve already at 124.4 km/h reaches 135+ km/h with full leg drive — while the first serve percentage improves. This is the rarest type of tennis fix: no trade-off.
1 winner from 54 BH shots. Every BH is comfortably absorbed. Extending contact 5" produces a heavier, deeper ball that forces opponents off the baseline. Address BH first (safer wing to experiment on) and the technique beds in easier than on the FH. As BH becomes a weapon, Maya Chen stops running around it — reducing FH volume and therefore FH errors.
59.2% in, target 70%+. Reducing from 124 to ~112 km/h — combined with the racket drop and leg drive fixes — pushes percentage to tour-level while keeping the serve dangerous. When 1st serve lands: 69% of points won. More first serves landing = direct match win rate improvement.
BH 78.8 km/h vs FH 86.6 km/h — the full gap is explainable by the separation deficit. Once BH hits ~55° separation, it becomes pace-equal with the FH. Then Maya Chen stops running around it — less FH volume, less FH errors. The two wings improve each other.
71% Down T is readable in game 2. Not in the serve report but critical from match data. Adding body serves and wider placement forces opponents to cover more court — making the existing T-serve even more effective. Low technical complexity, high tactical impact. Add after mechanics fixes are embedded.
The same bookend problem appears in all three reports. Late start (FH ~67°, BH reactive, Serve near baseline landing) and short finish (~140° on all three strokes). This is one systemic timing-and-commitment pattern, not three separate problems. Addressing it globally — starting the prep trigger earlier on every stroke — is the most efficient training investment at this stage.
Full match statistics, patterns, tactics & strategy
Maya Chen won a tightly contested match 7–6, then dominated the tiebreak 7–2 despite winning 54.5% of total points. This demonstrates exceptional clutch performance and mental resilience under pressure. She possesses genuine power — 124.4 km/h average first serve, hard-hitting groundstrokes — but the narrow margin reveals clear room for improvement. While she wins through pressure and opponent errors (81% of points), reducing her own 24 unforced errors and 6 double faults transforms 7–6 nail-biters into routine 6–3, 6–4 victories.
124.4 km/h average, 10 service winners. Won 69% of points when 1st serve landed in — the highest-impact stat of the match.
65% accuracy across 111 forehands. 6 outright winners. Hits 84.5 km/h in winning points — controlled aggression at its best.
Won the most pressure-filled format convincingly 7–2. Won 4 of last 5 regular games after going down 2–3 in the set.
Only 7 BH unforced errors vs opponent's 12. Disciplined backhand was a key difference-maker in extended rallies.
Saved 7 of 9 break points (77.8%). Under pressure on serve, Maya Chen held her nerve far better than her opponent.
The starkest gap in the match. 6 double faults gifted free points. The 2nd serve needs more margin, not more pace.
17 FH unforced errors — biggest single source of lost points. The same weapon that wins points also concedes them.
Heavy at 124.4 km/h but only 59.2% in. High pace with inconsistent placement creates constant 2nd serve pressure.
Only 2 of 8 break chances converted. Converting even 1 more per set turns a tiebreak into a comfortable straight-set win.
17 winners vs 24 unforced errors — a 1:1.4 ratio. Tour standard is 1:1 or better. 7 fewer errors flips this ratio positive.
| Metric | Forehand | Backhand |
|---|---|---|
| Avg Speed | 86.6 km/h | 78.8 km/h |
| Accuracy (% In) | 65% | 59% |
| Unforced Errors | 17 | 7 |
| Winners | 6 | 1 |
| Stat | Maya Chen | Opponent | Edge |
|---|---|---|---|
| Points Won | 55 (54.5%) | 46 (45.5%) | Maya Chen ✓ |
| 1st Serve % | 59.2% | 46.2% | Maya Chen ✓ |
| 1st Serve Speed | 124.4 km/h | 98.6 km/h | Maya Chen ✓ |
| Service Winners | 10 | 8 | Maya Chen ✓ |
| Double Faults | 6 | 0 | Opp ✓ |
| FH Winners | 6 | 3 | Maya Chen ✓ |
| FH Unforced Err. | 17 | 16 | Even |
| BH Unforced Err. | 7 | 12 | Maya Chen ✓ |
| BP Converted | 25% (2/8) | 22% (2/9) | Even |
| BP Saved | 78% (7/9) | 75% (6/8) | Maya Chen ✓ |
| Priority | Focus Area | Current | Target | Progress | Drill Recommendation |
|---|---|---|---|---|---|
| 1 — Critical | Double Fault Elimination | 6 DFs | <2 DFs | 100 2nd serves at 90% pace, only count serves with 80%+ in rate | |
| 2 — Critical | FH Error Reduction | 17 UFEs | <10 UFEs | 20-ball cross-court FH rallies at 80% pace — consistency over winners | |
| 3 — High | 1st Serve Percentage | 59.2% | 70%+ | Bucket serves at ¾ pace, track %, advance to full pace only after 70% sustained | |
| 4 — High | Break Point Conversion | 25% (2/8) | 40%+ | BP simulation: deep central return → build 5+ shots → attack open court | |
| 5 — Medium | Backhand Stability | 59% in | 70%+ in | Cross-court BH exchanges emphasising depth — target 3m from baseline | |
| 6 — Low | Net Play Confidence | 11 net shots | 15+ / match | Approach + volley drills — attack short balls and finish at net |
Maya Chen has already proven she can win tight matches through mental toughness and clutch performance — the 7–2 tiebreak is emphatic evidence of that. She possesses all the physical tools: a heavy serve at 124 km/h, a dangerous forehand, and backhand discipline that outperformed her opponent. The data reveals a player who doesn't need to hit harder — she needs to hit smarter. Reduce double faults, control the forehand, and extend rallies into the 5–8 shot range: those three changes alone convert 7–6 tiebreak wins into routine 6–3, 6–4 victories.
Phase-by-phase biomechanical analysis & drills
An honest breakdown of what's working, what's holding you back, and exactly how to fix it.
What the video shows — and what it means for your game
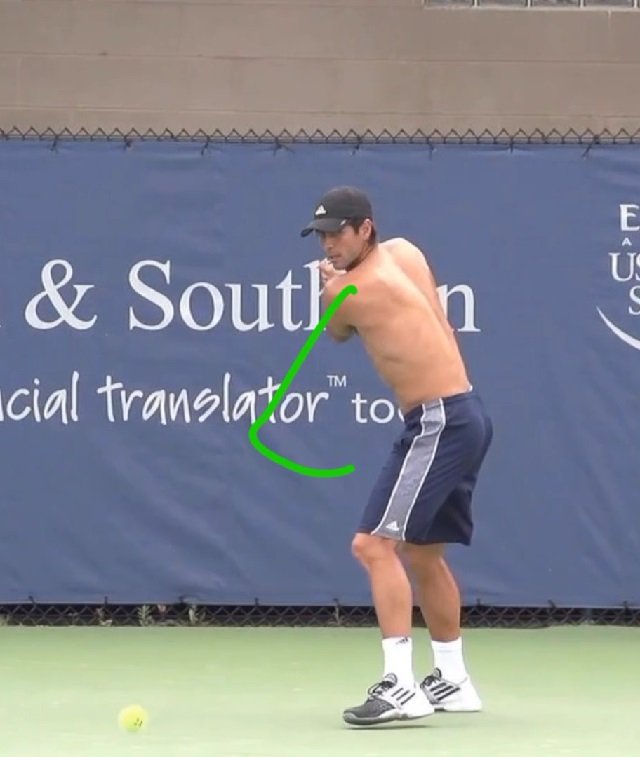
Maya Chen's forehand is genuinely solid. There's a real shoulder turn, consistent contact, and reliable mechanics under pressure. The gap to elite isn't about fixing fundamentals — it's about unlocking power and depth that's already available in your body but not yet being used. These are advanced refinements, not beginner corrections.


The shoulder turn is good but starts slightly late. Getting it moving earlier — as soon as the opponent makes contact — creates more time and a more loaded position.
The hips and shoulders are rotating together too much. Creating a bigger gap between them (coil) is where elite power comes from — not arm strength.
Contact is happening a bit close to the body. Reaching out further in front creates a longer lever arm — the same swing effort produces a heavier, deeper ball.
The racket drop is functional but the lag angle could be deeper and held longer. More lag = more whip at contact, without swinging harder.
| Metric | Current (Video) | Elite Target | ATP/WTA Pro Reference |
|---|---|---|---|
| Preparation Timing | Ball at net | Before net | Djokovic: Exceptionally early |
| Shoulder Turn | 65–70° | 80–85° | Nadal: 85–90° |
| Hip–Shoulder Separation | ~35° | 50–55° | Djokovic: 55–60° |
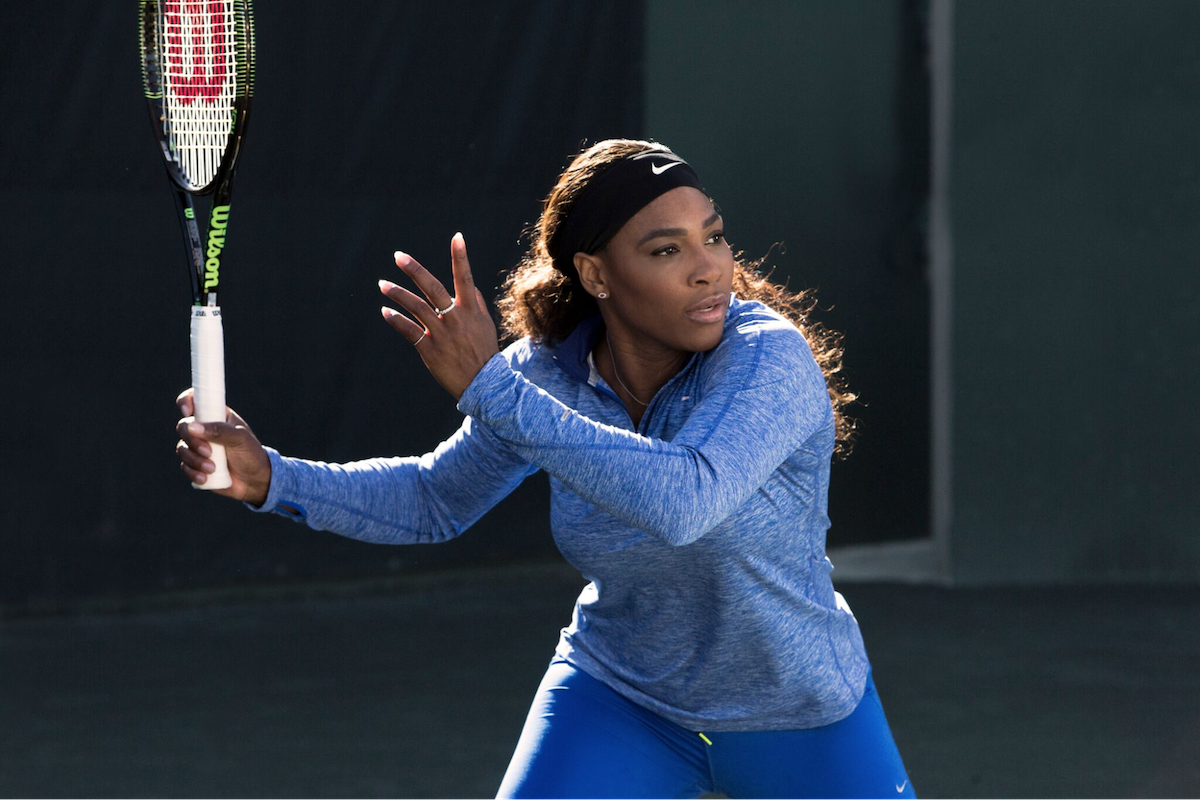
| Contact Point Distance | 12–14 in | 16–18 in | Serena: 18+ in |
| Racket Drop Depth | Moderate | Below hip level | Extreme lag position |
| Weight Transfer | ~60% forward | 75–80% forward | Explosive forward drive |
| Body Rotation (Finish) | 130–140° | 160–180° | Full chest-to-net rotation |
The estimates above come from AI visual analysis of your video — not motion capture or instrumented measurement. The angles and distances are educated approximations. Use them as directional guides, not precise readings. A Dartfish session or Sports2D analysis would give you real numbers if you want them.
The foundation of everything that follows
When the ball leaves your opponent's racket, your first move determines everything that follows. Maya Chen turns her shoulders well — this is already a strength. The refinements here are about timing and depth, not rebuilding.
The turn starts slightly after the ideal trigger point. Elite players begin their shoulder rotation almost simultaneously with opponent contact — within 50–80ms. There's also roughly 18° more rotation available that's not being captured. The non-hitting hand releases the racket throat slightly early, which reduces how far the shoulder can coil.
More shoulder turn creates a bigger backswing without taking the racket farther back. More power, same control. Think of it like a pitcher's windup — a longer, earlier load produces more velocity through better mechanics, not more muscle.
This puts Maya Chen in the top third of competitive club players. Elite WTA players average closer to 85°+, with some reaching near 90°. The gap is real but not large — this is a refinement, not a rebuild.
Start turning the moment your opponent swings, not when the ball bounces. This one timing shift creates significantly more preparation time and naturally increases how far the coil reaches.
Solid rotation but initiated slightly late, leaving the last 18° of coil potential untapped. Non-hitting hand leaves the racket throat slightly early, which is the primary limiter on how far the shoulder can turn.
Back nearly facing the net. Non-hitting hand stays on the racket throat to guide maximum rotation. Turn begins at opponent contact, not at ball bounce. This creates a significantly larger coil without changing racket position.
"The unit turn is the most important part of the modern forehand. It loads the body for power while keeping the racket in a compact, controllable position."
— Modern Tennis CoachingWhere racket head speed is generated — without swinging harder
After the unit turn, the racket head drops below the hand — this is "lag." The angle between the forearm and racket stores energy. More lag, held longer, released later = more speed at contact.
The racket drop is functional — it's there and it creates rhythm. What's missing is depth and duration. The lag angle is moderate, and the wrist releases slightly early. Elite players hold a deeper angle until the last moment, then let it snap. The difference in feel is the difference between a controlled swing and a whip.
Lag works like a whip. The longer you maintain the angle between forearm and racket, the more angular momentum builds. A loose grip (3–4 out of 10) lets the wrist cock naturally. A tight grip kills lag entirely. The racket head speed difference between moderate and deep lag can be 15–20% — with identical swing effort.
The drop is present and creates usable rhythm. What's available is a deeper angle (racket head further below the hip) and a later wrist release. This isn't measurable from standard video with precision — but it's visible as a qualitative difference from elite players.
Racket drops with some wrist set. Creates a functional, rhythmic swing with good consistency. The angle is real but shorter than it could be, and the release happens a fraction early. Result: reliable contact, moderate ball weight.
Racket head drops well below the hip. Wrist stays fully cocked until the hand reaches hip height on the forward swing, then snaps. The ball leaves the strings with noticeably more weight and topspin, even on what feels like an easy swing.


"Players who master lag hit heavy balls without appearing to swing hard. That's the whole point — efficiency over effort."
— Tennis BiomechanicsWhere the ball is hit determines how heavy it lands
Maya Chen makes solid, consistent contact. The ball goes where it's aimed. The refinement here is about where in front of the body contact happens — moving it further forward adds leverage that no amount of arm strength can replicate.
Contact appears to happen at roughly 13 inches from the torso — solid, consistent, and with a slightly bent arm. Elite players reach out to 16–18 inches, arm more fully extended. The difference in ball depth and weight is significant, even when the swing feels identical.
Every inch of extension is an inch of additional leverage. At 13 inches you're using mostly isolated arm muscles. At 18 inches you're using your full body length as one integrated lever. The physics mean the same swing effort produces a heavier, deeper ball — one that bounces higher and pushes opponents back.
This is reliable and consistent — which is a real strength. The upgrade here is gradual: aim for 15", then 16", then 18". Rushing this creates arm tension and loss of timing. Give it several weeks of focused drill work.
Ball struck with a bent arm, reasonably in front of the body. Reliable and rarely produces errors. Limited in depth and ball weight — opponents can comfortably handle most of these shots from behind the baseline.
Arm nearly fully extended, contact well in front of the front foot. Requires confidence and timing, but produces shots that land 2–3 feet deeper with noticeably more weight. Opponents are pushed back. The rally dynamic changes.
Finishing the shot and starting the next one simultaneously
Maya Chen finishes well — this is not a problem area. The refinement is about completing the rotation fully, which does two things: it extracts the remaining power from the kinetic chain, and it sets up a faster recovery to the ready position.
The finish goes over the shoulder — correct. Chest rotation toward the net is partial, roughly 45–60° instead of the 90° seen in elite players. The body stops rotating slightly before the swing is complete, which costs a small amount of power and slows recovery.
Full rotation isn't just about power — it clears the hips for the next shot. When you rotate completely, the body naturally unwinds into the ready position. Elite players are recovering while the ball is still in the air because their follow-through momentum carries them back into position automatically.
Watch elite players — many use their non-hitting hand to "catch" the racket at the finish. This isn't style. It acts as a brake that signals full rotation has occurred, prevents over-swing, and helps with balance. Maya Chen can add this as a confirmation check on full finish.

"The follow-through isn't the end of the shot. It's the beginning of recovery. Players who understand this are always in position."
— Elite CoachingThe X-Factor — where effortless power actually comes from
Hip–shoulder separation is the single largest gap between Maya Chen's current forehand and an elite one. It's also the most trainable. The concept is simple: hips and shoulders rotate different amounts, creating a coil. The bigger the coil, the more explosive the release — without additional arm effort.
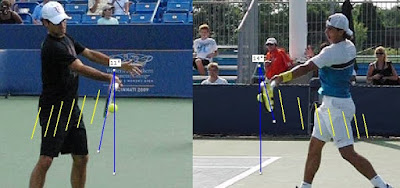
The hips and shoulders are rotating together more than they should. There's some separation — roughly an estimated 35° — but elite players create closer to 55°. This means Maya Chen's hips are coming around too early, or the shoulders aren't being held back enough.
The result: the torso "coil" is reduced. Power is coming mostly from the arm and shoulder, rather than from the loaded-and-released core. This is why the swing looks good but the ball doesn't feel as heavy as it could.
Your torso is a rubber band connecting hips and shoulders. The more you twist it (greater separation), the more elastic energy stores up. When released — starting from the ground, through the legs and hips — that energy snaps the shoulders around, multiplying racket head speed by 20–30% without additional muscular effort. This is what "effortless power" actually means.
Both rotate at similar rates, which produces a coordinated but under-powered swing. The core is not being loaded — power must come from the arm. Reliable, consistent, but lacks the "pop" of elite groundstrokes. Core engagement is partial.
Hips stay relatively forward while shoulders turn back significantly further. You feel a genuine stretch across the obliques and lower back — this is the load. When released from the ground up, the stored energy snaps the shoulders through explosively. Power feels effortless.

As you prepare, feel your belt buckle staying relatively forward. Imagine someone holding it while your upper body turns. Hips should rotate roughly half as much as the shoulders during the preparation phase.
Continue rotating shoulders to 85° while hips stay at ~30°. Keep the non-hitting hand on the racket throat as long as possible — this is what guides the shoulders further back.
You should feel genuine tension across the side of your body — obliques and lower back. This is the coil loading. If you don't feel it, you're not creating enough separation. This sensation is the target.
Push off the back foot. Let hips rotate first. Shoulders follow automatically — don't muscle them around. The arm goes last. If the sequence is right, the swing feels surprisingly easy for how hard the ball travels.
"Robin Söderling took a massive shoulder turn — almost 90 degrees beyond his hips — and crushed forehands because of it. The coil is the power source."
— Fault Tolerant TennisTargeted practice — each drill isolates one refinement
These drills are for advanced players with solid fundamentals. The goal is targeted isolation: master each element separately before combining them. Film yourself — objective feedback is essential at this stage. Quality over quantity. 20 perfect reps beat 200 careless ones.
Stand at the baseline without a ball. Turn shoulders to ~85° while keeping hips at ~30°. Hold 3 seconds. Feel the stretch in your obliques and lower back. Release. Repeat 20 times. If you don't feel a stretch, you're not separating enough.
Stand sideways to a wall with your back hip touching it. Turn shoulders back to 85°+ while keeping the hip in contact with the wall. This physically prevents early hip rotation. Shadow swing while maintaining hip contact.
Coach feeds balls slowly. You prepare fully, then pause at maximum coil for 2 full seconds before hitting. This forces you to consciously reach maximum separation before swinging. Slow feeds only — this is about feel, not timing.
Place a cone 18" in front of your stance. Coach feeds. You must contact the ball at the cone position — full reach. If contact happens closer to your body, the rep doesn't count, even if the ball goes in. Start with easy feeds.
Coach feeds wide forehands. Move forward and outward to meet the ball rather than waiting for it. Extend to full reach, then recover to center. Emphasises moving toward the ball aggressively and reaching out, not letting it come to you.
Drop-feed balls to yourself. Hit forehands focusing only on reaching as far as feels natural, then 2 inches farther. Film from the side. Compare your contact distance to elite players. Measure progress session to session.
Hold the racket at preparation height. Relax your grip completely. Let the racket fall by gravity — don't force it. Feel the head dropping below the hand. Catch at the bottom. Repeat. This trains the passive, relaxed lag that elite players use.
Shadow swings at 25% speed. Create deep lag, hold the angle as long as possible, then let the wrist release last. The racket should "snap" through the contact zone. Gradually increase speed only when the lag sensation is consistent.
Watch 5 minutes of Osaka or Serena forehands, focusing only on the racket drop. Not the whole swing — just the drop. Then hit 20 balls trying to replicate that feeling. Film from behind. Compare the drop depth.
Rally cooperatively. Before each forehand mentally check three things: (1) Am I coiled? (2) Am I reaching out? (3) Am I finishing fully? If any element is absent, note it. Don't worry about the result — technique quality is the score.
Film 10 forehands from two angles — behind and from the side. Review immediately. Check each of the four refinements. Identify the one that needs the most work. That becomes the focus for the next two sessions.
Play points. Before each forehand, pick one cue — "coil" or "reach" or "finish." Focus only on that cue. After the point, note if you executed it. Progress from cooperative play to competitive points as technique becomes automatic.
"The difference between good and great isn't more practice — it's better practice. Every rep must have a purpose."
— Elite Player DevelopmentPhase-by-phase biomechanical analysis & drills
An honest breakdown of what's working, what's holding you back, and exactly how to fix it.
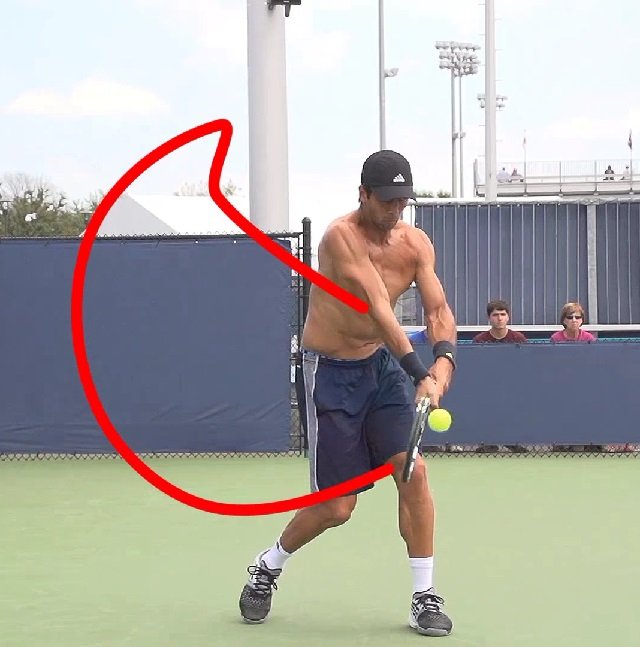
A solid backhand with clear paths to becoming a weapon
The two-handed backhand in the video is genuinely good — balanced, consistent, and reliable. The foundation is all there. What separates this from an elite backhand isn't raw ability, it's the refinement of five specific technical elements that compound to create a much heavier, more powerful shot.
The turn is starting when the ball crosses the net. Elite players begin the unit turn the moment the ball leaves the opponent's strings — this gives time to fully load.
The coil is moderate — hips and shoulders turning somewhat together. Elite players create extreme separation, loading the torso like a spring before releasing explosively.
Lag is present but conservative. The racket needs to drop lower — below hip level — and hold that angle longer before releasing into the ball for maximum whip acceleration.
Contact is happening a little close to the body. Reaching further out — 4–5 inches more — creates a longer lever arm, directly increasing pace and penetration through the court.
The follow-through stops short of full rotation. Chest needs to finish facing the net — this isn't just an aesthetic finish, it's where the final 20% of energy transfer happens.
Good balance throughout the swing. Compact, controlled preparation. Consistent contact point. Proper grip positioning. Reliable footwork. These are not trivial — many players at this level still struggle with fundamentals. The work ahead is refinement, not rebuilding.

The unit turn — earlier is almost always better
The backhand preparation in the video shows a reactive rather than proactive approach. The shoulder turn begins as the ball crosses the net — slightly late. Elite players begin their turn the moment the ball leaves the opponent's strings, giving the body far more time to load a full coil.
This isn't about reacting faster. It's about making the decision to turn before you know exactly where the ball is going — you adjust with your feet after the turn has started, not instead of it.
Ball crosses the net → judge direction → begin turn. The problem: by the time the turn starts, there's limited time to complete the coil before the swing must begin. The result is a slightly rushed, compressed hit.
Ball leaves opponent's strings → turn starts immediately. Direction is confirmed and feet adjust while the shoulders are already rotating. By the time the ball arrives, the body is fully loaded and waiting.
The split step (small hop as the opponent makes contact) and the unit turn should be one connected motion. In the video they appear as two separate steps. Elite players land their split step with the shoulders already beginning to rotate — the jump and the turn fuse into one action, buying critical extra time.
The best backhands look effortless because the work is done early. By the time the ball arrives, the body is loaded and waiting — there's no urgency, no rush.
— Modern tennis coaching principleHip-shoulder separation — the most important power lever
This is the single most critical refinement available to transform a good backhand into a weapon. Hip-shoulder separation — sometimes called the "X-factor" — is the difference between players who swing at the ball and players who throw the ball with their whole body.
The video shows moderate separation. Hips and shoulders are turning somewhat independently, but not to the extreme that elite players create. The result is a functional swing, but one that relies more on arm strength than on stored elastic energy.
Hips and shoulders both rotate, with some independent separation. Core muscles are engaged but not maximally loaded. The swing generates good pace, but requires more muscular effort to produce it.
Hips stay relatively forward while shoulders rotate much further back. The stretch across the obliques is intense — you'll feel it. When released, this elastic energy snaps the shoulders around without extra arm effort.
The core muscles connecting hips to shoulders act like a rubber band. The more you twist them (separation), the more elastic energy stores up. When the hips drive forward and the shoulders resist, then release — that stored energy snaps the shoulders around at speeds no arm-only swing can match. This is why elite backhands sound different: the whip-crack effect.
During preparation, feel the back hip actively resisting rotation. Imagine someone holding your belt buckle in place while your upper body turns. The hips should rotate roughly half as much as the shoulders.
Keep rotating the shoulders until the back shoulder points toward the back fence. Use the non-dominant hand to actively pull the racket further back — this increases the stretch.
There should be a noticeable tension across the side (obliques) and a mild pull in the lower back. This is the "load." If you don't feel it, the separation isn't deep enough.
Begin the forward swing by pushing off the back foot. Hips rotate first — closing the separation gap — then the shoulders whip forward. The arms follow automatically. Don't force the arms: let them be pulled by the body.
The two-handed backhand generates power from the ground up — but the multiplier is in the torso. Players who master separation hit heavy balls without swinging harder.
— Tennis biomechanics principleRacket drop and lag — the whip-crack mechanism
The video shows a controlled, smooth racket drop with moderate lag — the angle held between forearm and racket head. The swing is technically sound. To generate elite-level pace and spin, the racket needs to drop lower and later, creating a more pronounced whip-like effect through the hitting zone.
Racket drops to roughly hip height with a functional angle. The swing is smooth and consistent, generating reliable pace. The drop appears slightly guided rather than allowed to fall naturally.
Racket head falls well below hip level. The angle is maintained until the last moment, then released explosively through the ball. The key: let gravity do the dropping, not the hands.
In the video, the racket drop appears slightly controlled or guided. Elite players deliberately relax their grip during the preparation phase and let the weight of the racket head pull it downward naturally. This creates deeper lag with less muscular tension, allowing a faster, more explosive acceleration through contact.
The best two-handers look effortless because the racket is doing the work. The deep drop stores the energy; the release creates the speed.
— Tennis technique analysisExtension and leverage — every inch counts
The contact point in the video is functional but conservative — the ball is struck with slightly bent arms, roughly 12–14 inches from the body. This is safe and consistent. But elite players reach out significantly further, creating more leverage and a more penetrating, flatter trajectory through the court.
Every extra inch of extension adds lever arm length. The same rotational speed from the body produces noticeably more racket head speed at a more extended contact point — with zero extra muscular effort.
Contact with elbows bent, roughly a foot from the torso. Consistent and safe. But the shorter lever arm limits pace, and the slightly pulled-in position tends to produce a more defensive ball that doesn't push opponents back.
Arms nearly fully extended at contact. Requires confidence and precise timing — it feels risky at first. But the longer lever produces a noticeably heavier, more penetrating ball that forces opponents further back.
Contacting further in front does two things: it creates a longer lever (more racket head speed) and it naturally produces a more forward ball flight trajectory. This is what players mean by a "heavy" backhand — the ball stays low, travels fast through the court, and pushes opponents behind the baseline. A contact point close to the body creates a more upward brushing motion, which loses pace and depth.
Great backhands are hit out there — far in front of the body. It feels risky at first, but that's where the power lives.
— Professional coaching insightThe kinetic chain — sequential acceleration from ground to racket
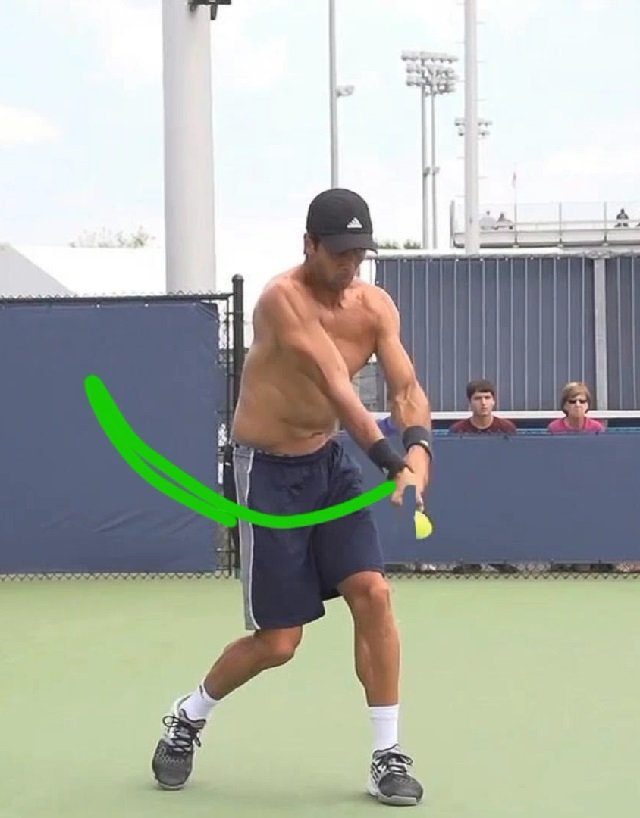
The video demonstrates partial kinetic chain utilisation. Legs push, hips rotate, but the energy transfer isn't fully sequential — shoulders start rotating before hips have fully driven, "leaking" energy that should be building through the chain. Elite backhands channel ground force through a precise sequence, each segment peaking just as the next begins.
In the video, the backhand occasionally looks "pushed" — muscled through with arm strength doing significant work. Elite backhands "pop" off the racket with a distinct whip-like crack. This sound comes from sequential acceleration: each body segment reaches peak speed, then decelerates, transferring that energy to the next link. The arm is just the final link — it shouldn't be generating force, it should be receiving it.
Legs and hips working, but shoulders initiating slightly early. Energy "leaks" at the hip-shoulder transition. Arms compensate by adding muscle. Result: decent pace with more physical effort than necessary.
Each segment peaks as the next begins. Hips fully clear before shoulders start. Arms are passive receivers of energy, not generators. Result: maximum pace with the sensation of effortless power.

The two-handed backhand is a full-body throw. The arms are the delivery mechanism — the power comes from the ground, multiplied through the core, released at the last moment.
— Sports biomechanics principleTwelve targeted drills — from isolation to integration
These drills specifically target the five optimisations identified in the video analysis. They progress from isolation (mastering one element without the pressure of a moving ball) through to integration (combining all elements under match-like pressure). Film yourself performing these drills — objective feedback is essential at this level.
Stand at baseline. Coach says "hit" the moment they make contact. You must begin your shoulder turn on "hit" — not when you see the ball. Practice until the turn is complete before the ball crosses the net.
Stand with your back hip touching a wall or fence post. Practice the unit turn — shoulders rotate fully back, hip stays touching the wall. Hold the coil for 3 seconds, then shadow swing. If the hip leaves the wall, you're not separating.
Shadow swings with split steps. Jump, land — and as the feet hit the ground, shoulders are already beginning to rotate. The split and the turn should fuse into one motion. If there's a pause between landing and turning, slow down and merge them.
Hold the racket at preparation height with a completely relaxed grip. Consciously let go of any guiding tension and allow the racket head to fall naturally — gravity pulls it down. Catch it at the bottom. Repeat until the drop feels passive, not guided.
Shadow swings focusing only on path. The racket must drop below knee level, then rise through the imaginary contact zone and finish above the opposite shoulder. Use a mirror or phone to verify the depth of the drop — most people don't drop as far as they think.
Slow-motion swings at 25% speed. Create maximum lag angle, hold it consciously as long as possible, then release through imaginary contact. Gradually increase to 50%, 75%, full speed — maintaining the delayed release sensation throughout.
Place a cone 18 inches in front of where you typically make contact. Coach feeds balls. You must strike at the cone's position — reaching fully forward. Any contact that happens inside the cone is a void rep. Gradually the extended contact point becomes natural.
Place cones 3 feet inside the baseline as targets. Rally with a partner — every backhand must land beyond the target line. This forces extension through the ball for depth. Brushing up for safety won't reach the cones; only driving forward will.
Coach feeds specifically at waist height — the ideal contact zone for a driving backhand. Focus entirely on pushing through the ball rather than lifting. After 20 balls, coach varies the height and you must find and adjust to waist-high contact each time.
Rally with partner focusing on all five elements. After each backhand, run a quick internal checklist: Did I coil? Did I extend? Did I finish? If any element is missing, focus it on the next shot. Quality over consistency at this stage.
Play full points where forehands are declared out — both players backhands only. This forces the backhand to be used as a weapon, not just a defensive shot. Focus on technique checkpoints between points, not during rallies.
Hit against a wall practising all technical elements. The wall gives instant feedback — poor technique produces a weak or mis-timed return. Film yourself from the side to check coil depth and extension. A phone on a cone is enough.
The difference between a good backhand and a great backhand isn't talent — it's the willingness to exaggerate the technical elements until they become automatic. Extension feels risky until one day it simply doesn't.
— Elite player developmentPhase-by-phase biomechanical analysis & drills
Four refinements that separate a reliable serve from a genuine weapon.
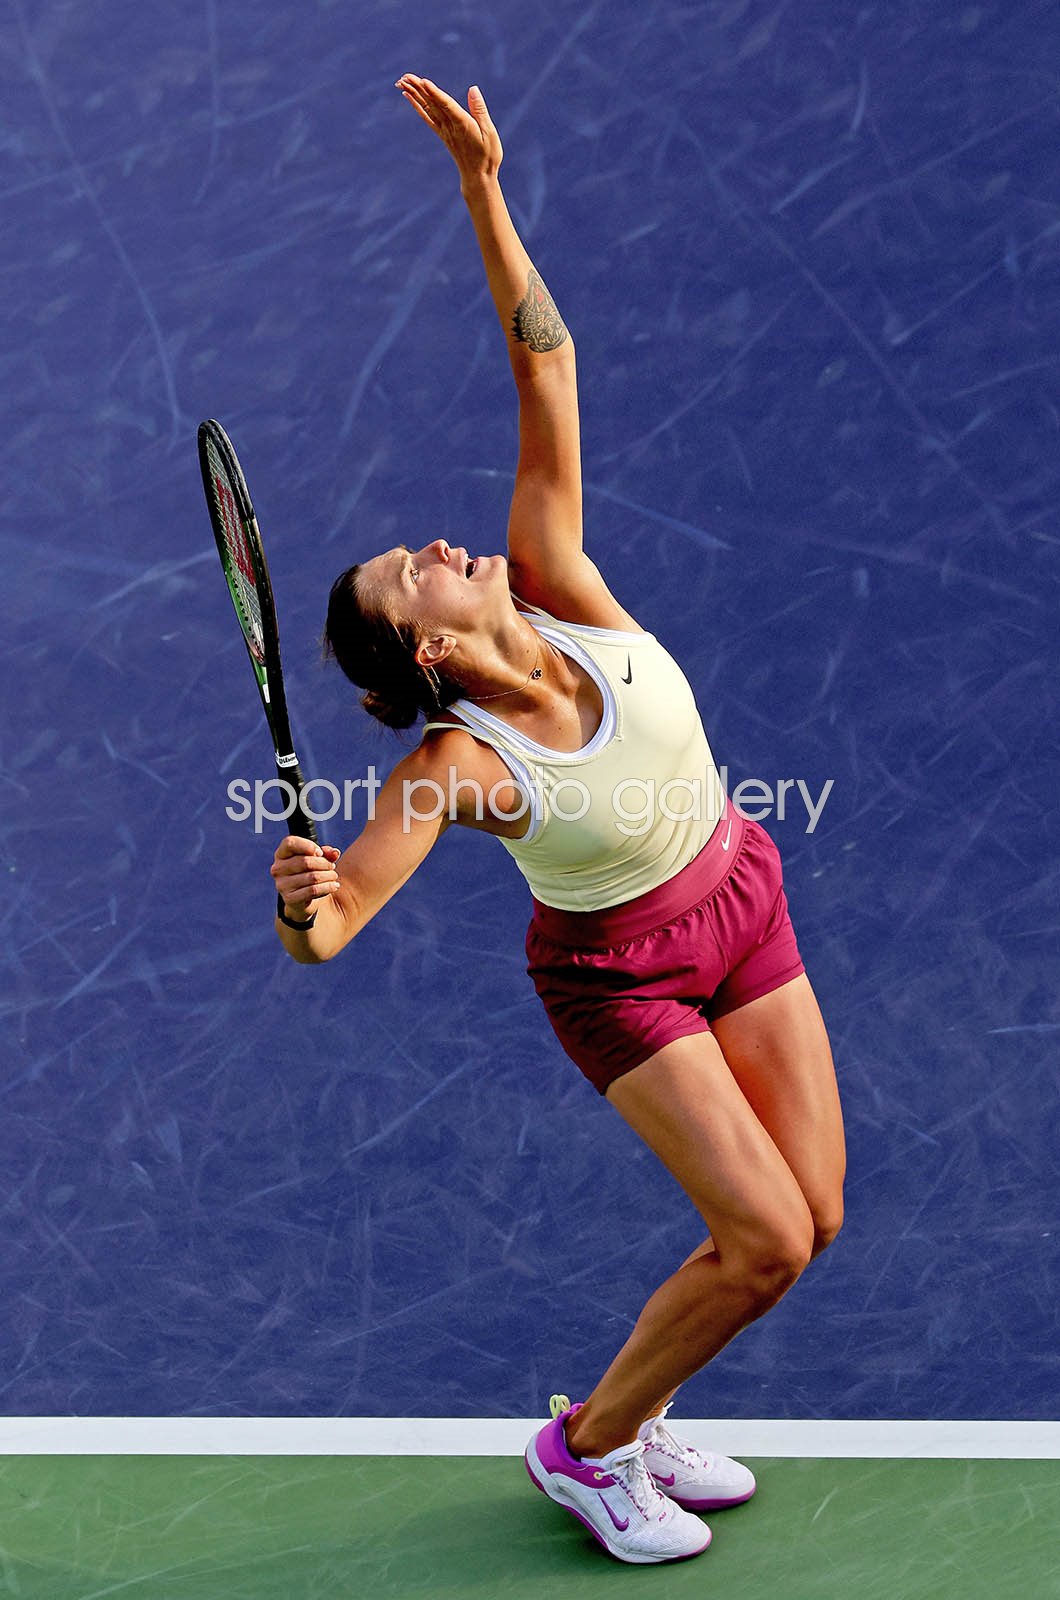
A consistent serve with clear paths to becoming a weapon
The serve in the video is functional and reliable — a solid foundation. What's missing isn't fundamental; it's the four technical elements that compound to create a genuinely heavy, fast, high-percentage first serve. The good news: each refinement feeds the next. Fix the trophy position and the racket drop improves automatically. Improve the leg drive and contact point rises naturally.
The elbow bend in trophy is functional but not fully loaded. Elite servers create a deeper coil — elbow back further, shoulder more externally rotated — which stores energy before the swing even starts.
Knee bend is moderate. Elite servers sit deeper — almost like a loaded squat — then explode upward, adding 10–15mph from the legs alone. Currently the legs contribute but don't drive.
The racket drop after trophy is present but abbreviated. Elite servers let the racket fall deeper behind the back — the "scratch your back" position — before looping up through contact. More drop equals more acceleration distance.
Contact is happening slightly below maximum reach. Full arm extension at contact — body arched, shoulder shrugged up — gains critical centimetres of height, creating steeper angle and more net clearance.
| Metric | Current (Video) | Elite Target | Pro Reference |
|---|---|---|---|
| Trophy Coil Depth | Shallow — functional | Deep, fully loaded | Serena / Kvitova: extreme |
| Knee Bend | Moderate (~110°) | Deep (~140–150°) | Deep squat before explosion |
| Racket Drop | Early, abbreviated | Deep "scratch back" | Racket nearly touches lower back |
| Arm Extension at Contact | ~78% of full | Near full (95%+) | Shoulder shrugged to ear |
| Follow-Through Rotation | Adequate (~140°) | Full (~180°) | Racket wraps past opposite hip |
| Landing Position | Near baseline | Inside baseline | Forward momentum into court |
Reliable toss placement. Consistent rhythm and timing. Good basic platform stance. Smooth motion without obvious hitches. These matter — plenty of players are still fighting fundamentals at this level. The work ahead is about unlocking more power and angle, not rebuilding from the ground up.
The loading phase — where power is stored, not generated
The trophy position is where a serve is won or lost before the swing even starts. Maya Chen reaches a functional trophy position — the arm is up, the body is turned — but it's not fully loaded. The elbow sits too high and the shoulder hasn't rotated far enough back to create maximum elastic tension in the hitting shoulder.
This matters because the trophy position determines the length of the acceleration path. A deeper coil means the racket travels further before contact. A shallower coil means the arm has to do more muscular work to compensate — which is both less powerful and less consistent.
Elbow is raised but not deeply bent. Shoulder has turned but the external rotation stops short of elite range. The position is repeatable and comfortable, which is valuable — but it leaves stored energy on the table.
Elbow bends deeply with the forearm dropping behind the head. Shoulder rotates to the point where there's a noticeable stretch across the front of the shoulder and chest. The position looks and feels uncomfortable at first — that tension is the power waiting to release.
A deeper elbow bend creates a longer radius from shoulder to racket head. When the shoulder internally rotates at contact, a longer lever arm means the racket tip travels faster — the same muscle contraction produces more speed. This is purely mechanical advantage, not more strength. Elite servers look effortless precisely because their mechanics are working for them rather than against them.
As the toss goes up, consciously allow the elbow to travel backward — pointing toward the back fence rather than the sky. The racket head should feel heavy and drop behind the hand.
The hitting shoulder should turn until there's a visible stretch across the front of the chest. Think of it as trying to show the back of your hand to the court behind you.
There's a tendency to rush out of trophy toward the swing. Pause — the ball is still rising. The trophy position should be held until the ball begins to descend. This patience creates the timing for a deeper drop and more explosive swing.
If the position is deep enough, there should be a noticeable tension across the front of the hitting shoulder. That uncomfortable stretch is the elastic energy stored. A comfortable trophy position is an under-loaded one.
The trophy position stores the serve's energy. The swing only releases what was loaded here — you can't generate what you didn't store.
— Tennis biomechanics principleThe engine — ground force is free power
The legs are responsible for roughly 40% of total serve pace — and they're the easiest power source to improve because it's a skill, not a strength issue. Maya Chen uses her legs, but the knee bend is moderate and the upward drive is conservative. More depth in the knees, more explosion upward.
The mental model is simple: the serve should feel like a jump that happens to hit a ball. If the feet stay on the ground comfortably after contact, the legs didn't fire properly. Elite servers land inside the baseline because their forward momentum demands it.
Knees bend to a moderate angle, providing some upward drive but not maximum loading. The jump after contact is small. The legs are part of the motion but not driving it. Power is compensated from the arm and shoulder.
Knees sit much deeper — the feeling is closer to sitting in a low chair. The upward explosion is sudden and aggressive. The body leaves the ground on most first serves. Landing is noticeably inside the baseline. The legs make the arm's job easier, not harder.
More knee bend before the jump means the body rises higher. Higher body position means the racket makes contact at a greater height. Greater contact height means a steeper downward angle into the service box, which means more pace with more margin over the net. The chain reaction starts in the knees — improving leg drive simultaneously improves the contact point for free.
Platform stance (feet stay wide) tends to produce more upward force — better for knee bend and explosion. Pinpoint stance (back foot slides in) can generate more rotation. Both are valid. The key isn't which stance — it's how deeply the knees bend in either one. Many club players use pinpoint stance but slide the foot so late that the knee bend is lost. Prioritise depth over foot position.

The serve is the only shot where the ball doesn't come to you. You control the whole setup. That makes the legs the most important factor — there's no excuse not to use them fully.
— Serve development principleThe power loop — acceleration starts from the bottom
After the trophy position, the racket falls behind the back before looping up to contact. This drop is where racket head speed is created. Maya Chen's drop is present but abbreviated — the racket doesn't fall as deeply as it could before beginning its upward loop, which means it's accelerating over a shorter distance.
The key mental shift: the drop should be passive, not active. Elite servers don't pull the racket down — they relax the grip, and gravity does the dropping. Tension in the hand creates a shorter, more muscular drop. Relaxation creates a longer, faster loop.
The racket begins its upward swing before it has reached maximum depth behind the back. The acceleration path is functional, but shorter than optimal. The elbow pronates slightly early, reducing the lever arm through the hitting zone.
The racket falls until it nearly touches the lower back — the classic "scratch your back" cue. From this deep starting point, the upward loop accelerates over 40% more distance than a shallow drop. Pronation is delayed until the very end, maintaining the lever arm all the way through contact.
Think of the racket swing as a pendulum. The farther back a pendulum starts, the faster it swings forward — this is pure physics, not extra effort. A deeper racket drop means the racket head travels further before contact, accumulating speed the entire way. The player who drops deeper hits harder with the same swing — their mechanics are generating what feels like free pace.
Inside the racket drop is the pronation of the forearm — the rotation of the arm that brings the racket face through the ball. Maya Chen's pronation fires slightly early, which is common at this level. Delaying it — holding the edge-of-racket-facing-back-fence position until the hand is at ear height — then snapping through creates a whip effect that adds significant pace without extra arm strength.

The best servers don't swing harder — they swing longer. A deeper drop creates a longer arc, and a longer arc creates a faster racket without extra effort.
— Serve mechanics principleMaximum extension — height creates angle
Maya Chen contacts the ball at a good height, but the arm isn't reaching full extension — there are a few more centimetres available. Those centimetres matter more on a serve than anywhere else in the game, because contact height directly controls the angle the ball can take over the net.
Higher contact means the ball has a steeper downward trajectory once it clears the net — it lands deeper with a more aggressive bounce. The same serve speed at full extension lands harder and kicks higher than at 80% extension. It's geometry, not power.
Arm reaches good height but isn't fully locked out. The shoulder hasn't shrugged fully toward the ear. Contact is happening slightly early in the upward arc — before the body has fully extended and left the ground. The ball can still go in, but the angle and depth are submaximal.
Arm is near-locked at contact. Shoulder is shrugged upward. Back is arched. Contact happens at the very apex of the jump and arm reach — every available centimetre used. The body looks like a taut bow at the moment of contact.
Every extra centimetre of contact height does two things simultaneously: it increases the downward angle into the service box (so the ball lands deeper) and it increases the net clearance for the same landing depth (so the serve percentage goes up). Higher contact is one of the few technical changes that makes a serve both faster and more consistent at the same time.
Actively push the hitting shoulder toward the ear at the moment of contact. This gains 3–5cm of height without any other adjustment and is one of the quickest wins available.
Allow the lower back to arch as the body extends through the serve. This is a natural consequence of good leg drive — the upward explosion pushes the hips forward and the chest toward the sky.
Time the contact to happen at the very peak of the jump and arm extension — not before or after. The toss placement controls this: toss it slightly further forward and higher than feels comfortable.
The elbow should be nearly straight at contact — not bent. A bent elbow at contact is almost always a symptom of either a low toss or contact happening too early in the motion.

Contact the ball at the absolute highest point possible. This is the one technical change that simultaneously adds pace, depth, and consistency to the serve.
— Serve technique principleComplete the energy transfer — and protect the shoulder
The follow-through isn't just an aesthetic finish — it's how the arm decelerates safely, and it directly determines where the body ends up after the serve. Maya Chen's follow-through is adequate but stops short of full rotation. The racket finishes across the body, but not as deeply past the opposite hip as elite servers.
This matters for two reasons. First, incomplete follow-through means the energy transfer was incomplete — some of the kinetic chain didn't fully release. Second, a truncated deceleration puts more stress on the shoulder than a long, flowing one. A proper follow-through protects the joint by spreading that load over more time.
The racket finishes across the body but doesn't wrap fully past the opposite hip. The body rotation stops before chest is fully facing the net. Landing is near the baseline rather than inside it, suggesting the forward momentum wasn't fully committed.
The racket finishes well past the opposite hip — sometimes touching the thigh. The chest faces the net completely. The landing is inside the baseline, and the player is immediately balanced and ready. The whole movement reads as one fluid, committed motion.
At contact, the racket is moving fast. That speed has to go somewhere. A short follow-through stops the arm abruptly — the rotator cuff absorbs a sudden shock. A long follow-through spreads the deceleration across a longer arc, reducing peak stress on the joint. Players who follow through completely have significantly fewer shoulder issues over a career than those who cut the swing short.
The follow-through tells you everything about the serve that came before it. A committed, flowing finish means the whole motion worked. A truncated one usually means something upstream went wrong.
— Serve biomechanics observationTwelve targeted drills — isolation through to integration
These drills isolate the four refinements identified in the video analysis. They work from pure movement isolation (no ball, no pressure) through to full match-like integration. Film every drill session — what you think your body is doing and what it's actually doing are often very different at this level.
Toss the ball and move to trophy position. Catch the ball at its peak with the non-hitting hand. Hold the trophy position for 3 full seconds, focusing on elbow depth and shoulder rotation. Don't swing — just hold, feel the stretch, release. 20 reps.
Practice trophy position in front of a mirror or with phone filming from behind. Check: elbow pointing back, racket head dropped below the hand, shoulder visibly rotated. Hold 5 seconds, shadow swing, compare the film to a reference image of elite trophy position.
Toss the ball and reach trophy position as the ball is still rising. Catch the descending ball with the non-hitting hand — not the peak. This trains the patience to hold trophy while the ball completes its arc. If you're catching it on the way up, you're rushing.
Full serving motion without a ball, focusing only on the jump. Bend knees deeply — feel like you're about to sit down — then explode upward as high as possible. Don't even think about the arm. 3 sets of 10. Once the pattern feels explosive, add the arm motion.
Place a low chair or box behind you at baseline. Start each serve sitting lightly on the edge. Toss, then stand and serve. This forces a deeper knee position than players naturally adopt. Start with 50% power, focus entirely on the depth of the squat before exploding.
Place a target cone 40cm inside the baseline on the serving side. After each serve, the landing foot must reach the cone or beyond. If you're landing on the line, the legs went up instead of forward. Prioritise landing depth over serve placement for this drill.
Stand at trophy position. Consciously loosen the grip until the fingers barely hold the racket. Let the racket head fall entirely under gravity — do nothing active. Feel how much lower it drops when the hand relaxes versus when it controls the descent. That's the depth you're after.
Stand sideways to a wall. Perform the serve motion trying to touch the wall with the racket head at the bottom of the drop. The wall gives instant feedback — if you can't reach it, the drop isn't deep enough. Slow motion first, then gradually add speed over 10–15 reps.
Hang a target (a piece of string or cone on a stand) at the maximum reach height — as high as the arm can possibly touch with shoulder shrugged. Serve aiming to contact at that height. 50% power only. Every rep is about reaching height, not pace. Film from the side and compare arm extension.
Serve baskets with four mandatory checkpoints: (1) trophy felt loaded, (2) knees bent deeply before jump, (3) racket dropped to scratch-back position, (4) arm fully extended at contact. If any element is absent, the rep doesn't count — even if the serve goes in. Quality only.
Film 10 serves from the side and 10 from behind. Review in slow motion. For each, identify which of the four areas was strongest and which needs work. Pick one priority for the next session. Compare the trophy and drop positions to a reference frame of an elite serve. One priority at a time.
Play full service games. Before each serve, run a single mental cue from the current priority — just one, not all four. Between points, note whether you felt the element or not. After 30 minutes, count how many serves included the cue. Target: 70%+ conscious execution under point pressure.
The serve is the one shot in tennis you control completely. Nobody rushes you. Nobody throws it at you. Every improvement you make here shows up in the score before you've even returned the ball.
— Serve development principle